

As I was making my ombre baby blanket I was pondering between a few different animals that I could attach but I had not made up my mind, so I started to ask some of my coworkers. I work as a professional contemporary dancer and all of my co-workers are very creative and have great ideas. I had brought this blnaket to work on one day of our show week. Show week can tend to have a little bit of down time because all the lights need to be programed and the dances need to be spaced, etc. Anyway it leaves a lot of time for dancer bonding. I showed them the blanket and asked them all what I should make. There were a lot of great ideas but my one co-worker said I should make a giraffe and everyone responded really well to this idea. The all thought it would be so cute and I agreed!
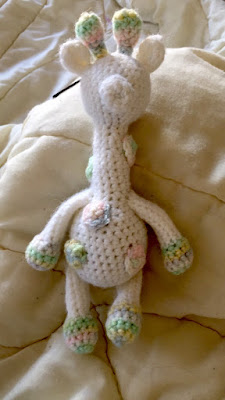
I was a bit nervous that I would not have enough of the ombre yarn, because it was from a big bag and had been used before. So I decided to just use the ombre color for the accents of the giraffe. I used the white yarn that I had plenty of for the body and it gave the giraffe a beautiful whimsical look! My boyfriend even though it looked a bit like a doctor seuss character!
This pattern measures to be about 8 inches tall and 4 inches wide.
You can choose any color combination that you want for this little guy. I chose to use a white base and an ombre soft baby color yarn for the accent colors to match the baby blnaket that I created.
If you would like a PDF version of the pattern you can purchase it at my etsy store!
If you would like a PDF version of the pattern you can purchase it at my etsy store!
Happy crocheting!!

You will need:
- 3.5mm (E/4) crochet hook
- yarn for the main part of giraffe (I used Red Heart White yarn
)
- yarn for the accents of giraffe (I used Caron Simply Baby Yarn Ombre (05001) Oh Baby
)
- polyester toy stuffing (I used Fairfield Poly-Fil Premium
)
- blunt end needle
- scissors
- straight pins (to help with assembly)
I decided to use the 3.5 mm crochet hook to make tighter stitches. The tighter stitches made a smaller amigurumi animal and was the perfect size for attaching to a baby blnaket! If you choose to use a larger or smaller crochet hook, that is fine it will just make your amigurumi animal larger or smaller.

Difficulty: Moderate (some of the assembly is a bit tricky)
This patterns has the following stitches:
- st = stitch
- sl/st = slip stitch (UK single crochet)
- sc = single crochet (UK double crochet)
- ch = chain
- inc = two sc in one stitch
- 2tog = two stitches together (decrease)
- f/o = finish off
Note: This pattern is worked in continuous rounds without joining each round.
Main:
This pattern starts with the body and then transitions into the head.

Using your main color ch 3
Round 1: 6 sc into first ch of your chain 3 (6)
Round 2: inc in each sc (12)
Round 3: [inc in next sc, 1 sc in next sc] 6 times (18)
Round 4: [inc in next sc, 2 sc] 6 times (24)
Round 5: [inc in next sc, 3 sc] 6 times (30)
Round 6-11: 30 sc (30)
Round 12: [2tog, 13 sc] twice (28)
Round 13: [2tog, 5 sc] four times (24)
Round 14: [2tog, 10 sc] twice (22)
Round 15: [2tog, 3 sc] four times (18)
Round 16: [2tog, 7sc] twice (16)
Round 17: [2tog, 6sc] twice (14)
Round 18-22: 14 sc (14)
----Stuff body----
Round 23: [2tog, 5 sc] twice (12)
Round 24: 12 sc (12)
Round 25: [2tog, 4 sc] twice (10)
Round 26-28: 10 sc (10)
Round 29: [inc in next sc, 4 sc] twice (12)
Round 30: [inc in next sc, 1 sc] 6 times (18)
Round 31: [inc in next sc, 2 sc] 6 times (24)
Round 32: [inc in next sc, 3 sc] 6 times (30)
Round 33-37: 30 sc )30)
Round 38: [2tog, 3 sc] 6 times (24)
Round 39: [2tog, 2 sc] 6 times (18)
Round 40: [2tog, 1 sc] 6 times (12)
----Put stuffing in neck and head. Make sure the neck is stuffed well ----
Round 41: [2tog] 6 times (6)
f/o
Nose:
Leave long tail for assembly.

Using your main color ch 3
Round 1: 4 sc in the first ch (4)
Round 2: [inc in next sc, 1 sc] twice (6)
Round 3: [inc in next sc, 2 sc] twice (8)
Round 4: [inc in next sc, 3 sc] twice (10)
Round 5: [inc in next sc, 4 sc] twice (12)
Round 6: 12 sc (12)
f/o
Ears:
Make two and leave a long tail for assembly.

Using your main color ch 3
Round 1: 4 sc in the first ch (4)
Round 2: [inc in next sc] 4 times (8)
Round 3-5: 8 sc (8)
Fold ear in half and secure the bottom end with a sl/st
Ossiclones (Head Bumps):
Make two and leave long tail for assembly.

Using accent color ch 3
Round 1: 4 sc in the first ch (4)
Round 2: [inc in next sc] 4 times (8)
Round 3&4: 8 sc (8)
Round 5: [2 tog] 4 times (4)
Round 6&7: 4 sc (4)
f/o
Legs:
Make four. Only put stuffing in the foot. Leave long tail for assembly.

Using accent color ch 3
Round 1: 4 sc in the first ch (4)
Round 2: [inc in next sc] 4 times (8)
Round 3: [inc in next st, 1 sc] 4 times (12)
Round 4&5: 12 sc (12)
Round 6: [2tog, 1 sc] 4 times (8)
----Switch to main color yarn----
Round 7: 8 sc (8)
Round 8-17: 8 sc (8)
f/o
put stuffing in ONLY the foot
Spots:
Make as many as you want. I made 8.

Using accent color ch 3
Round 1: 5 sc in the first ch (5)
Round 2: [inc in next st] 5 times (10)
sl/st and f/o

Using your needle you will sew together all the parts. Use straight pins to hold together the different parts as you go.
- Sew Nose onto the head.
- Sew Ossiclones (head bumps) onto crown of head
- Sew on ears
- Sew on legs. I started with the arms and then sewed on the legs. make sure to use your straight pins and pin all the legs on first before you start sewing to make sure they are even.
- Sew on spots. These can be very randomly placed.
 After you have fully assembled your giraffe you will have to tuck in your extra stings. I usually just stuff them into the animal with the needle or the back of the crochet hook.After the assembly you can give your giraffe eyes. For the eyes I just used black yarn and stitched them right onto the face. You can also use plastic stuffed animal safety eyes. You would just have to make sure to add the safety eyes to the head as you were crocheting.

I know that selecting yarn for projects can sometime be challenging. Should you go the thrifty route, the most natural, etc.? Most the time I try to be as thrifty as possible however whenever I am making things for babies or small children I like to try and use a natural option of yarn and filling. Below I have both the thrifty option and the natural option of yarn/filling for this project!
Thrifty:
- White Yarn: Red Heart White yarn
- Accent color: Caron Simply Baby Yarn Ombre (05001) Oh Baby
- Stuffing: Fairfield Poly-Fil Premium
Organic:
- White Yarn: Debbie Bliss - Eco Baby Organic Cotton - White 001
- Accent color: Debbie Bliss Eco Baby Prints Safari 100% Organic Cotton Fair Trade Yarn
or
Debbie Bliss Eco Baby Prints Meadow 100% Organic Cotton Fair Trade Yarn - Stuffing: Organic Raw Cotton Fiber - Natural Color - By the Pound
Don't miss my next pattern!
Please Note: This pattern in the property of heycrochailey. You may not sell or redistribute this pattern in any way.
However you may: Post up to two pictures on your blog or website with a link back to this post.
You may also: Sell your own handmade items form this pattern as long as there is a clearly listed link back to this post in your description.
However you may: Post up to two pictures on your blog or website with a link back to this post.
You may also: Sell your own handmade items form this pattern as long as there is a clearly listed link back to this post in your description.
No comments:
Post a Comment